Photoshop

Understanding Post-Processing – The Tutorial

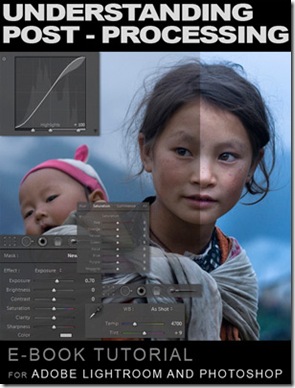
ebookcoverforweb Well, it’s finally here. I’ve spent the last couple of days finishing off the tutorial that I promised what seems like a long while ago now.

The preview PDF (1.5mb) is HERE.

You can buy it HERE.

The idea behind the tutorial was born from countless e-mails where people would ask me what I do to my images in Photoshop/Lightroom. Although how I post-process images is no rocket science, it is not necessarily something that can be described briefly in an email.

And so I have come up with a fairly comprehensive e-book, which goes right to the heart of what I do to my images in post. The instructions are detailed and should enable even a beginner with some basic knowledge to achieve the same results as I, with some practice.

I think that the content of this e-book may change the workflow for many photographers. The techniques are simple enough, yet they enable you to achieve dramatic results without spending too much time on each image. To me that’s important, as much as I enjoy the post-processing, I love shooting much more. Less post-processing equals more shooting.

I mentioned some time ago how much I loved Capture One and I still do, but I have found myself using Camera RAW in Photoshop CS4 and achieving great results much, much quicker than before. Apart from some interface differences, Lightroom is identical to Camera RAW in what it does. As a result I ended up writing this e-book tutorial for Lightroom and Photoshop users. The instructions for working with the RAW files are for Lightroom (I do provide screen-grabs from Photoshop, for parts where the interface is a little different). The instructions for work that can’t be done in Lightroom and additional touch up work are for Photoshop (CS3 and after).

The e-book is priced at $US12, but I feel that it will give infinitely more value to those who use it. :)

If you like the e-book or know photographers who may find it useful - spread the word. Any income from this will be used for good :) - i.e. photography and more travel, which will also result in more photography and more viewing pleasure for the readers of this blog. :)

Everything you need to buy the e-book is HERE.

Add to FacebookAdd to NewsvineAdd to DiggAdd to Del.icio.usAdd to StumbleuponAdd to RedditAdd to BlinklistAdd to TwitterAdd to TechnoratiAdd to Furl

Facing the inevitable – Taking another look at Camera RAW in Photoshop CS4.

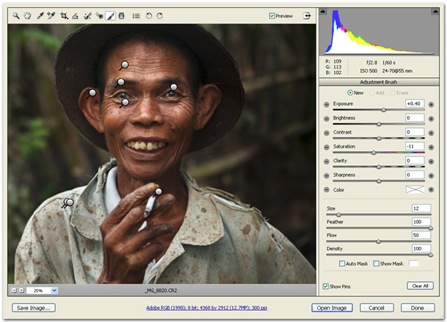
cameraraw_screengrab Over the last couple of weeks I’ve been playing around with Camera Raw in Adobe Photoshop CS4. The CS4 version has the local adjustments feature that Lightroom has had for quite some time now.

For whatever reason I never really fell in love with Lightroom and thus missed out on this wonderful feature. Capture One was my preferred software package. I hated knowing that the local adjustments feature existed and I wasn’t using it, but I felt that the image quality of Capture One made up for what I was missing out on.

Well, I gave the whole thing another go with Camera Raw in Adobe Photoshop CS4, I could resist no longer. True that I absolutely love Capture One, but in the end it’s just a tool and it would be stupid to get attached to it.

For files that are intended to end up as large prints, hanging in someone’s house or a gallery, Capture One is still my number one choice, but the convenience of local adjustments is too much to overlook for images that aren’t getting upsized too much. I feel that I will definitely make room for working with RAW files in Photoshop CS4.

Those who have Lightroom 2 already know how convenient it is to be able to adjust only select parts of an image, while you are still working with the RAW file. Local adjustments feature in Lightroom 2 is probably the major reason why many photographers are bypassing Photoshop all together. I still wouldn’t go so far as to stop using Photoshop, this is the only tool that allows me to do all the fine adjustments that I desire, but around 80% of the work can certainly be done in Lightroom 2 or Camera RAW in the new Photoshop.

I’ve provided a part of an image above, which is in the process of being edited in Camera RAW and it is already looking decent enough that only minor things will need to be done in Photoshop.

I am inclined towards making that PDF tutorial and I will now focus on the workflow in Camera RAW, which in its features is almost identical to Lightroom 2. There will still be some stuff that can only be done in Photoshop itself, or done more effectively in Photoshop, but most of the things can be accomplished in Lightroom.

I’m building a new website for the next couple of weeks or so, but before long I will have something up for those who are interested.

Demystifying Post-Processing (to an extent)

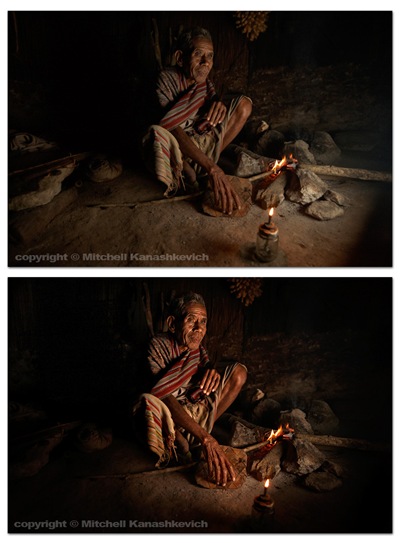
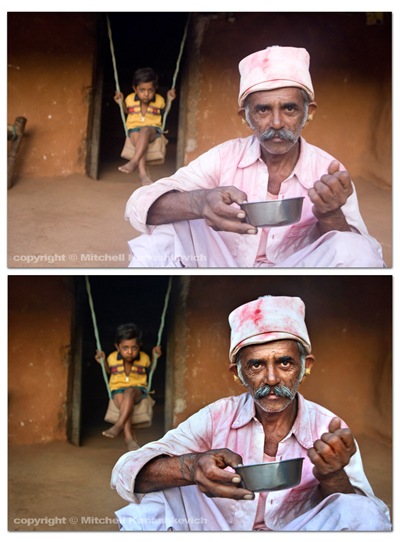
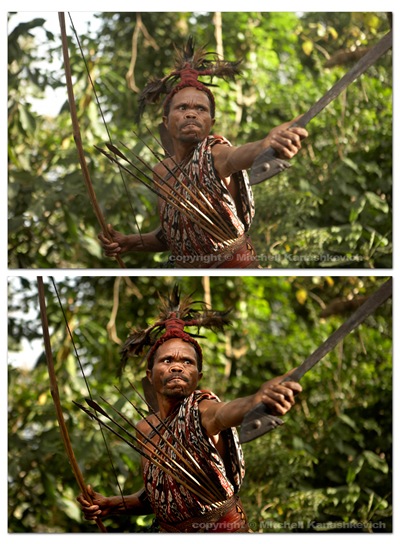
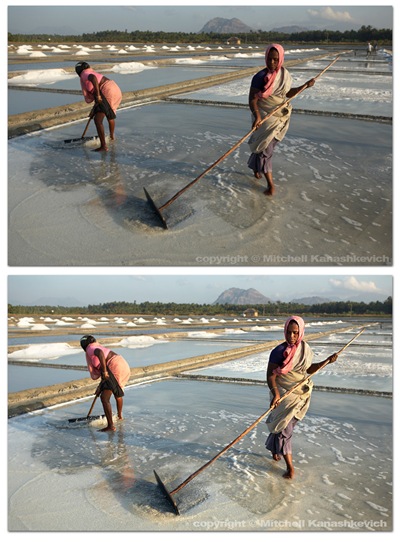
I said in the last post that I would put up some “before” and “after” images that would give people an insight into how much post-processing I do to my photographs, so here we go. As with the last post this isn’t a tutorial, but those who have a better than basic understanding of post-processing may get some ideas from this post. The “before” images which are unprocessed, as interpreted by “Caputre One”, they are on top and I have listed the key things which I have done with the post-processed "after" photographs. Click on each image for a closer view. Timor-FireBarda-HillsAlor-WarriorSalt-workersThe above images have pretty much been worked on in the same way.

  1. Slight cropping and sometimes rotating.
  2. Multiple versions of the same image created at varying exposures, later made into one in Photoshop. The reason – bringing out the details in highlights and shadows.
  3. Curves, levels adjustment layers created, I paint inside of these wherever I feel needed, to selectively darken and lighten areas
  4. Shadows and highlights – to further bring out the details.
  5. Dodging and burning for finishing touches.

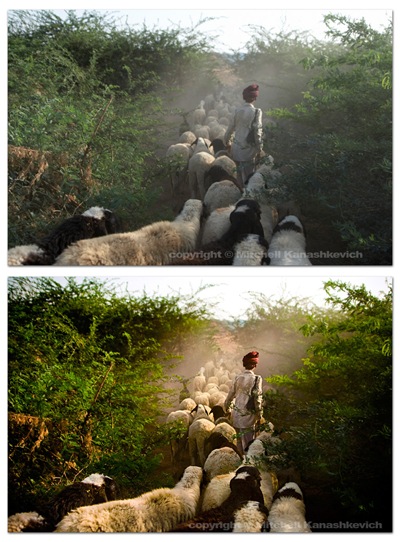
ShepherdThe image above had a little more done to it. On top of the previously mentioned processes I played around with the saturation and the white balance in the RAW file. More intense dodging and burning was required to add a bit of drama to the scene, to make the image look the way I remembered seeing it.

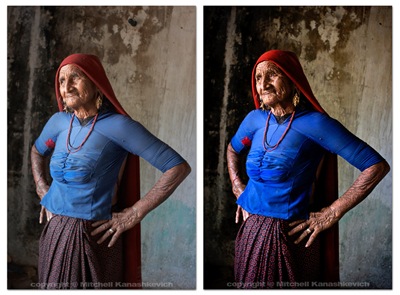
GrandmotherThe process for the image of this grandmother was similar to the first few and I chose to clone out a little black pipe that stuck out of the wall (top/center/right). I’m not a huge fan of cloning things out and some may argue that once things start to get modified on this level, the photograph becomes less “pure”. If it’s something small that doesn’t make or break the image, but bugs me I’ll clone it out without thinking twice, if it’s something that can radically change an image I’ll usually be a bit more cautious.

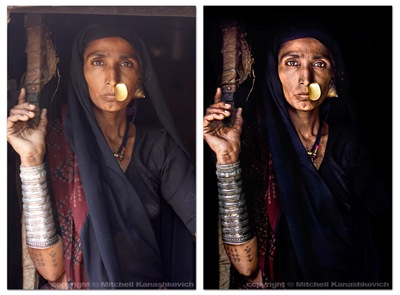
Rabari-Woman Out of the images I have presented here this one required the most work. I felt that I really needed to bump the contrasts and to dramatically darken certain parts of the photo. This sRGB conversion has a limited color range and is actually a little too dark (you loose details in the material), but you get the general idea. Same processes as stated above and just really a lot of playing around and seeing what works and what doesn’t.

That’s about it. As you can probably gather I like to keep my images looking as realistic as possible on the one side and as dramatic as possible on the other. I try to find the right balance. There are plenty of photographers who like to make their images look more dramatic, more saturated, more contrasty,  to a point of surreal. There are also those who like to selectively de-saturate parts of an image, but to keep contrasts high. Lots of particular “looks” are popular these days and many people try to emulate them. Sometimes these “looks” work and sometimes they are boring, repetitive and unnecessary. I’m not really into stylizing my color shots too much. I feel that this is a bit of a fad and at times this stylization is used to mask crap light or inconsistent color. A great image will be great regardless of whether it has been realistically processed or stylized (when this is done well). A crap, stylized image may pass off as decent at first glance because it grabs you with the dramatic, surreal color, but hang it on the wall and look at it for a few days and you’ll become very bored. Maybe I am somewhat conservative - for me it’s either the dramatic, yet realistic post processing approach or if I want to do my own kind of stylizing – it’s black and white. I do quite a bit of black and white and I will post something about that in the future.